
Getting Stoned and How to Strop It.
- bushcraftoperation
- Mar 14, 2023
- 8 min read
Updated: Jun 28, 2025
People from all walks of life have struggled at one point in time with the best way to sharpen a blade that has gone dull. From grinding to stone(s) with oil / water usage some have used glass and porcelain others strop their blades every time and call it good. The sharpening process, although semi complex, can be rather simple depending on intended usage and type of instrument you're trying to put or sharpen your edge on.
Our goal here is not to tell you the best or preferred method of sharpening your blades.
Our goal is simply to try and give you the knowledge to help you possibly develop a smoother edge and hopefully the desired sharpness on the bladed instrument you are using.

The "BURR" den of Blade Sharpening- When it comes to sharpening your blades, "How sharp is sharp?" is usually the question. Most of the "expert" knife sharpeners will say you need to develop a burr.
Let’s start by describing what a burr is. A burr is just a bit of metal along the knife edge or the tip of the knife. It’s a strip of steel or metal material that either stands on one side or the other. It’s the very tip of the cutting edge of the knife. You can also identify it as the raised edge or small pieces of material that remain attached after a modification process such as sharpening knives. Some refer to it as a wire edge because the burr appears like a fine wire on the edge of a freshly sharpened tool like a knife. It is an indicator that you have not left a microscopically flat surface at the edge (a bald spot) of the knife.
It may not be visible to the human eye, but when you zoom in on a sharpened knife edge, you will notice a plastic-like deformation of a metal at the apex of the cutting edge. It is like a small fold of metal on the other side of the edge that has been grinded.
The burr is formed as you push the knife across the surface of your sharpening device or pull the sharpening device across your knife. As you do this, steel is moved out to the end of the edge bevel. You will be able to feel if a burr is formed by placing your finger on the side of the knife opposite the side you are sharpening and gently feeling from the spine of the edge of the knife. I remember being told once "A good rule of thumb when working to form a burr is to count five strokes per side. Feel for a burr and then switch to the other side. Do this until you feel a consistent burr across the entire length of the edge. Once you do feel a burr, switch to the opposing side one last time and count five final strokes. It is important that you form a symmetrical edge and always counting five strokes per side keeps you from removing more on one side than the other". Remember fully removing the burr is important as it can damage what you are cutting into such as fish or wild game. The paper test is a good method starting at the base (closest to the handle) and moving towards the knife tip. The paper should be cut clean as any snag that rips the paper says you have not fully removed the burr.

I would almost be willing to bet if you ever used anything with a blade you have seen a sharpening stone. With the exception of chisels, axes or even hatchets. From kitchen knives to pocketknives almost any multi use knife you have used for any point in time has gone dull. Some knives, mainly of the utility design, have replaceable blades. What if you had a way to keep a knife sharp and functional with little time and effort? Well, that's where the sharpening stone comes into play. For many years now the staple of knife sharpening has been the stone sharpener. Remember, once you use oil you will have to always use oil. So, for the most part water is readily available. Just wet the stone and you can sharpen your blades just as well.

The Puck stone also needs to be wet. However, it fits in your hand which will allow you to sharpen larger blades such as axes or hatchets. The technique of "Circling" the blade using small circles or a figure eight motion depending on preference, developing a burr, and grinding it out will keep larger blades sharper. The Puck usually comes with coarse grit on one side and a finer grit on the other. The puck can be used on smaller blades as well. Attention to grit and watching the blade of the instrument your sharpening is key.
When it comes to sharpening any bladed instrument there are many things to consider. How sharp does the tool need to be for the job, development and full removal of a burr, whether or not you are going to polish your blade when its sharp and what type of edge or grind do you need. There are specialty grinds used for different purposes and jobs. Ask yourself, am I going to be cutting meat or making fire twills or would a sharper blade make my workload easier? Once you have the job / purpose and the blade figured out along with how sharp the blade will need to be, your set. Remember, a low grit say 600 would be used to remove chips or reshape where higher grit 2,000 to 6,000 would be used to sharpen and polish. Once the blade is sharp, stropping your blade will help maintain the edge.

Grinding It Out- a way to design specialty blades. Here I will give you a couple of different grinds and their uses mainly as food for thought. You can decide which grind, if any, you may or may not want to incorporate into your own knife collection.
Scandi Grinds- A Scandi grind carries a single bevel that runs to zero degrees. In other words, it is a single grind only. Unlike many other grinds, the Scandi runs to the edge with no angle change in what is also known as a zero grind. Scandi grinds have a flat section of the blade that starts at the top of the bevel and runs to the spine. The fact the Scandi is ground to zero allows the edge to be as thin as possible with no change in angle. Changes in angle create extra friction. Hence, the Scandi grind meets with the least resistance possible when it enters the cutting medium. Another benefit of a Scandi grind is that you can achieve a thin edge and, unlike with a full flat grind, you maintain the blade weight of a saber grind. Having that bit of extra spine weight increases your ability to drive the edge forward. As the blade enters the cutting medium, it meets the transition point where the bevel changes to the flat. This benefit is one of the reasons why the knife can dive deep into a cut and take off huge potato-chip-like shavings. This specific grind is exceptional for creating fire twills and carving.
Hollow Grind-A hollow ground knife blade is one that’s been ground to create a distinct beveled, concave edge along the knife’s cutting edge. This effect is achieved by having the grind start below the middle of the knife, producing a small concave wedge that’s very sharp and easy to maintain.
When making a hollow ground blade, a grinding wheel cuts a convex scoop from the blade. The knife’s cutting edge is found at the base of the scoop, and it’s very fine and therefore extremely sharp.
In cross section view, the blade almost looks like an old-school fountain pen nib, with a soft, fluted base and strong upper section. The secondary bevel is easily gripped with a sharpening stone, making sharpening super easy.
Hollow grind blades are perfect for soft, thin materials. They shouldn’t be used for tough materials with larger diameters. Hollow ground blades were traditionally used for scissors and straight razors.
Today, this blade type is mainly found in kitchen knives, as well as outdoor and hunting knives. If you want your knife to slice really well, but don’t want it to get too deep, a hollow grind will do the job superbly. Dressing your game needs a knife with excellent slicing to take off the skin. For this reason, hollow ground blades are common on hunting as well as skinning knives.

They say it's all about the angles. Depending on what type of blade and the job it will be used for the angle(s) is extremely important. In developing a burr to polishing and the grind of your specific bladed instrument as you can see above 10 to 25% angle will sharpen almost any knife you have or will need the trick is keeping the edge in contact with the sharpening surface. So, how do we do that without a machine or a work bench vise?
I personally use a "Rule of Thumb" technique. I look at my thumb and the blade to be sharpened me personally I use about a half of thumb as I have larger hands, smaller hands will require more thumb, and larger hands less thumb. Developing your own rule depends on thumb size and desired sharpness.
Heading In The Right Direction- How you are sharpening your blades will depend on what direction you move the blade across the sharpening implement.
Stone -
Should you be reshaping or removing chips in a blade move the blade from your person across the stone as if pushing the blade away. When reshaping or fixing deformities the lower the grit the better.
Should you be sharpening a blade start away from your person and move towards your person as if pulling it to you. Depending on how fine, sharp, and possibly polished you want your blade will determine how high a grit to use.
Should you find yourself in a survival situation you can use a palm sized rock. Remember to constantly check your blade and see what effect the sharpening device has on your blade.
An easy way to remember is hold your thumb up and tilt towards you and say I'm pretty sharp this gives you angle and direction of travel. Should you have ever dealt with someone who seems a little less intelligent that would get a thumbs down and you could point at them and say you need help this again gives you angle and path of travel and depending on how much help they need will test your grit sometimes you just may need to be a little more coarse.
As a Reminder always make sure stones are wet. Dry stones can be ruined if used and could possibly more than like cause pits in your blade. Think dry shaving and razor burn no one wants to dry shave or have razor burn so add a little water.
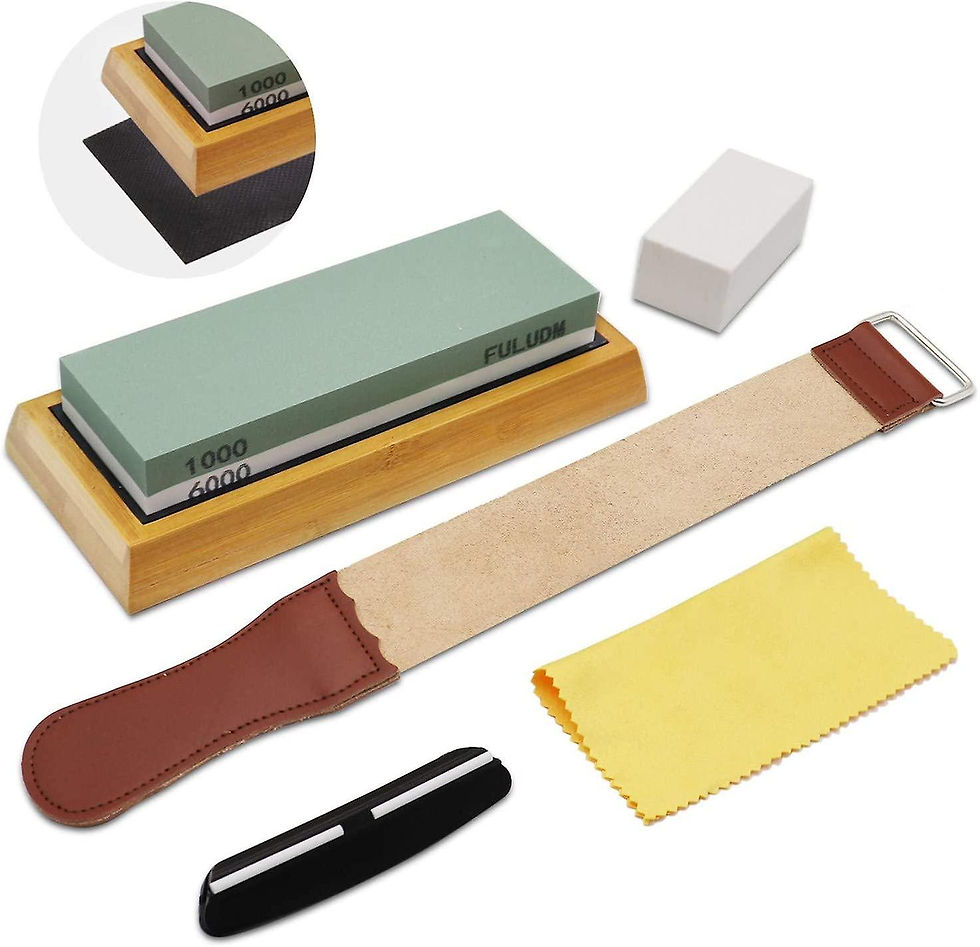
Reaching The Stropping Point- A Strop was used in old timey barber shops to sharpen straight razors. Today a Strop can be made with leather and Stropping compound and used regularly will help maintain the clean edge of your bladed instruments. Ready to give yourself a rest? So, you have worked through the "GRIND" and "SHARPENED" your skills now you're ready to "MAINTAIN YOUR EDGE" to do this you simply need to STROP your blades clean edge by moving forward through all the work lean back and relax (move the blade towards your person).
In closing it's best to remember as is anything in life
THAT the People Of The Same last name (P.O.T.S) are what is truly important and the best way to take care of them is to keep your wits and blades sharp.
When it comes to keeping your bladed instruments and your life in good condition and well maintained
PATIENCE is key.
ALWAYS pay attention to your blade and the people closest to you
NEVER add undo pressure in life or to your bladed instruments let the sharpening instrument do the work.
STROP your bladed instrument EVERY time it is used allowing you to maintain your edge.
Your Blade of choice will help in preparing meals for you and your family so in this instance it truly is ALL ABOUT THE P.O.T.S. and P.A.N.S.
SHOUT OUT- James Mastin was a major help in this month's blog post by giving me information to expand on
Until next time "STRUGGLE TO MAKE PUDDING"


Comments